Installing PyQt on Linux

Python by itself is a strong Programming Language but if you want more than lines of codes and Grphical User Interface for users to interact with, you need a GUI framework.
PyQt is one of the GUI frameworks for Python Developers.
Qt by itself is a set of C++ libraries and tools. PyQt is Python binding to work with Qt.

Below is some of the guidelines installing PyQt5 on Debian Linux.
In some Linux Distros where you have two different versions of Python, 2.7 and 3, make sure you use Python3.
Python 2.7 is not officially supported past 2020 anyways so its a good idea to stick with Python3.

Check Python Version

$python3 --version
it should show something like
$python 3.7.3
if you are not already on Python 3.7, install the latest
$sudo apt install python 3.7

Installation

$pip3 install --user pyqt5
$sudo apt-get install python3-pyqt5
$sudo apt-get install pyqt5-dev-tools
$sudo apt-get install qttools5-dev-tools


To test run, start by importing modules from PyQt5 –
from PyQt5 import QtCore, QtGui, QtWidgets

Happy Coding
Regards

Teza

Wireshark Capturing methods

There are different ways you can capture Network traffic using Wireshark.
1) Locally on host interface
2) Wire Tapping
3) Port Mirroring or SPAN

1) Simplest way of capturing traffic from local traffic (your own computer).
Just select the interface that you want to monitor and hit RUN. Nothing is simpler.

2) Wire Tapping
Another sneaky way of capturing the traffic is to tap the wire.
Instead of Network devices connected directly to each other, simply put a device in between.
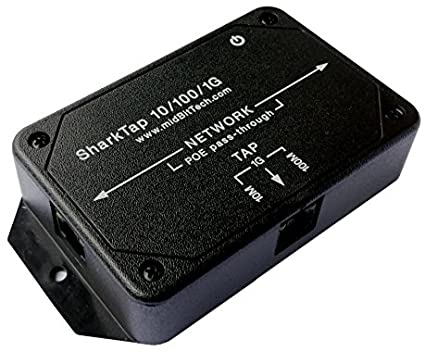
Devices like below will do the job. Connect to this device with your wireshark computer and start capturing.


3) Port Mirroring
Switchport analyzer or SPAN is feature on Cisco switches where you can forward the captured packets from one interface to another for monitoring and analyzing.
Its simple to set up, on the device you want to set up span, configure as per below. in below config, fa0/1 will be the interface we want to capture and the packets will be forwarded to fa0/24. A Wireshark PC will be connected to fa0/24.

#config t
#monitor session 1 source int fa0/1 both
#monitor session 1 destination int fa0/24
#do show monitor

If you want to read more about SPAN, below is a link from Cisco on it.
https://www.cisco.com/assets/sol/sb/Switches_Emulators_v2_3_5_xx/help/250/index.html#page/tesla_250_olh/span_overview.html

The SPAN feature, which is sometimes called port mirroring or port monitoring, selects network traffic for analysis by a network analyzer. The network analyzer can be a Cisco SwitchProbe device or other Remote Monitoring (RMON) probes. Port mirroring is used on a network device to send a copy of network packets, seen on a single device port, multiple device ports, or an entire VLAN, to a network monitoring connection on another port on the device. This is commonly used when monitoring of network traffic, such as for an intrusion-detection system, is required. A network analyzer, connected to the monitoring port, processes the data packets. The device can mirror up to four interfaces per session.A packet, which is received on a network port and assigned to a VLAN that is subject to mirroring, is mirrored to the analyzer port even if the packet was eventually trapped or discarded. Packets sent by the device are mirrored when Transmit (Tx) mirroring is activated.Mirroring does not guarantee that all traffic from the source port(s) is received on the analyzer (destination) port. If more data is sent to the analyzer port than it can support, some data might be lost.

L I N U X – L I N U X – L I N U X ! ! ! New Beginner’s Guide

Here is my advise on Windows users if you want to try Linux out for the first time.
This will be a series of videos to help you from Linux total beginner to Power user level.
So If you like my videos and find them interesting, please Like and Subscribe my channel.

Why not! its just one simple click and you will get all my tech notes tutorials for free!

Changing Huawei ONT HS8545M5 password with MD5 and SHA256 hashes

Its always good to change the default password of your Network Devices.
Below is the instruction on how to change the default password for your Huawei ONT.
It works for Huawei ONT model H545M5 but I am sure it works the same of other Huawei ONTs as well.

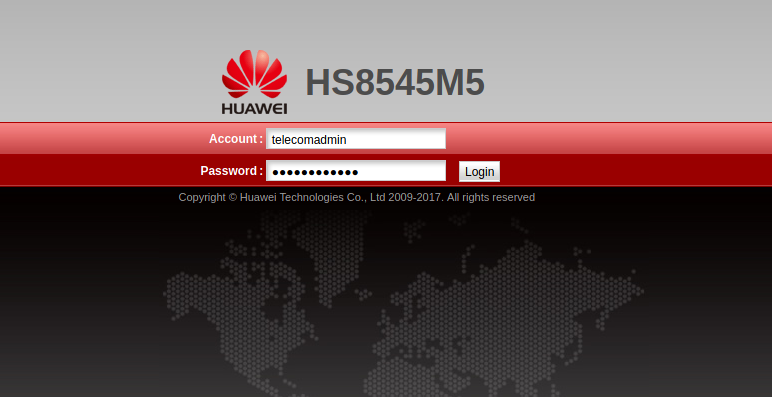
  1. First of all, from your browser, you need to go to router’s IP. The default should be 192.168.100.1
    If that doesnt work, do the IP scan first.
  2. Then you need to know the default username and password. Default for HS8545M5 is
    Account : telecomadmin
    Password : admintelecom
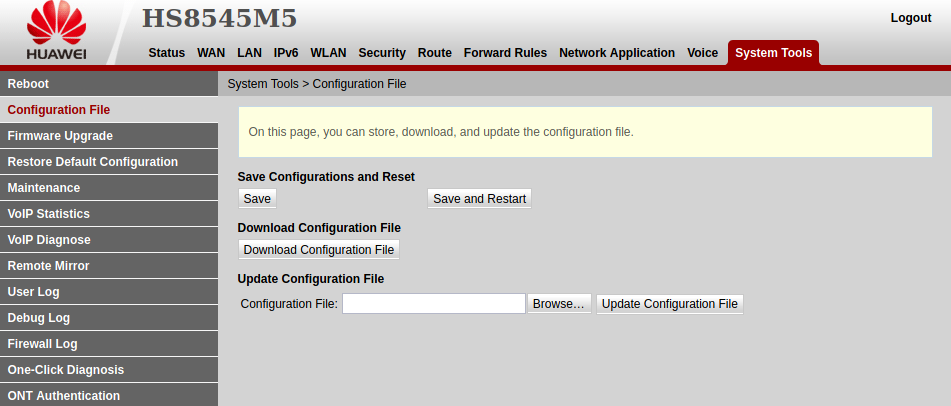
  3. Once logged in, navigate to System Tools > Configuration File
    Download the configuration file
    You will download hw_ctree.xml file
    ** Before making any changes, its a good idea to save the back up of your configuration file. ***

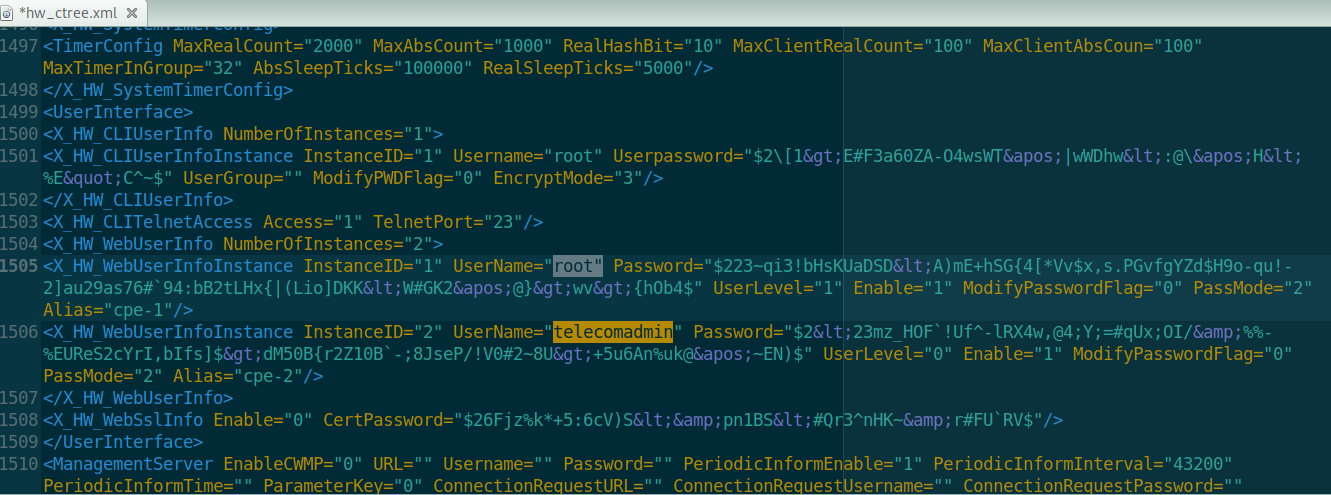
  4. Open with any text editor and search for Username and Password fields.
    Copy the password hash just in case something goes wrong.

  5. Huawei devices uses two step hashes. MD5 and SHA256.
    If you are a Linux user, use below commands to create hashes 5 new password.
    OR
    You can also use online has converters from below link.
    https://www.freeformatter.com/md5-generator.html

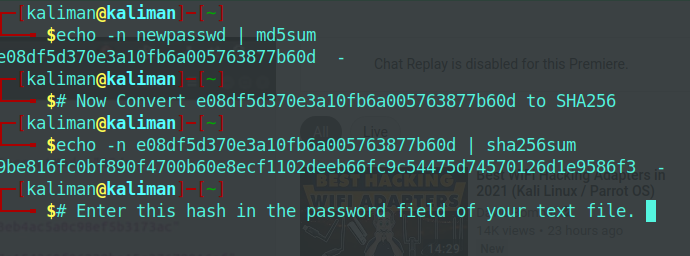
    A. First convert your plain text password to MD5 and then convert your MD5 to SHA256 hash.

──╼ $echo -n newpasswd | md5sum

e08df5d370e3a10fb6a005763877b60d –

$# Now Convert e08df5d370e3a10fb6a005763877b60d to SHA256

└──╼ $echo -n e08df5d370e3a10fb6a005763877b60d | sha256sum

9be816fc0bf890f4700b60e8ecf1102deeb66fc9c54475d74570126d1e9586f3

With your new SHA256 hash, update your config text file and upload config text file to your ONT.
Reboot the ONT and login with the new password.

Mind you again , its always a good idea to keep the backup of your config file in case something goes wrong.

Cheers
Teza

wifi card with monitor mode and packet injections

When you do Wireless pen-testings, you want to use these tools.
airmon-ng
airodump-ng
aireplay-ng

Basically what that means is you want your wireless cards to be able to perform these tasks.
Change monitor mode
Packet capturing
Packet Injection.

If you want to go fancier, you might also want to have a look at TX gain, band etc but nevermind that for now.

Not all wireless cards support above functions.

And its hard to tell if you get the right wireless adapter, because there are many different wifi adapters brands out there, but you need to find one with the right chipset.

Here is a link for you to consult with. See if you wireless card has the right chipset.
https://www.kali.org/docs/nethunter/wireless-cards/
It will help you to find the right wireless cards, but sometimes you can get lucky even if your card is not on that list.

For me, I have a built in Relatek chipset, which is not listed in the link above, but does all the required tasks to perform the wifi testing.
I also happened to buy a TP-Link TL-WN722N which happens to be version 2/3 (only version 1 has the right chipset) but I heard there is a way to get it working with different driver.

So, the best way to get the right wireless card, you need to find the right chipset . Do a bit of research on the card that you have or you are buying.
You wont know what chipset it uses, so you have to dig a bit into that as well.

use lspci to find out what chipset installed for your wireless
use lsusb to find out which chipset your wifi adapter uses.

Start off by changing to monitor mode and see if monitor mode is supported. Then carry on with other tools.
iwconfig wlan0 mode monitor

man info for the tools I mentioned earlier –

airmon-ng This script can be used to enable monitor mode on wireless interfaces. It may also be used to go back from monitor mode to managed mode. Entering the airmon-ng command without parameters will show the interfaces status. It can also list/kill programs that can interfere with the wireless card operation.

airodump-ng is used for packet capturing of raw 802.11 frames for the intent of using them with aircrack-ng. If you have a GPS receiver connected to the computer, airodump-ng is capable of logging the coordinates of the found access points. Additionally, airodump-ng writes out a text file containing the details of all access points and clients seen.

aireplay-ng is used to inject/replay frames. The primary function is to generate traffic for the later use in aircrack-ng for cracking the WEP and WPA-PSK keys. There are different attacks which can cause deauthentications for the purpose of capturing WPA handshake data, fake authentications, Interactive packet replay, hand-crafted ARP request injection and ARP-request reinjection. With the packetforge-ng tool it’s possible to create arbitrary frames.


Cheers

Teza

Zenmap Installation in Debian using ALIEN package converter

If you are familiar with Security tools or Penetration testing, you definitely must have heard of Nmap.

Zenmap is a GUI of Nmap.

However it is no longer included in later version of Security testing OSs.
Below is an instruction on how to install it on Debian machines.

1) Download the latest RPM package at https://nmap.org/download.html
Optional Zenmap GUI (all platforms): zenmap-7.91-1.noarch.rpm

2) Note it is RPM package, so you will need to convert it to install on Debian. For that, you will need a package converter called ALIEN.

man alien >> alien is a program that converts between Red Hat rpm, Debian deb, Stampede slp, Slackware tgz, and Solaris pkg file formats. If you want to use a package from another linux distribution than the one you have installed on your system, you can use alien to convert it to your preferred package format and install it.

3) Latest version of alien (alien_8.95) seems to have a glitch when installing so, if you happened to have installed that, you will need to uninstall and downgrade to alien_8.90.

Download link below.
http://archive.ubuntu.com/ubuntu/pool/main/a/alien/alien_8.90_all.deb

4) Install using your package manager or command line below.
dpkg -i alien_8.90_all.deb

5) Convert your Zenmap RPM package that you downloaded to .deb
sudo alien zenmap-7.91-1.noarch.rpm

6) Now you will get the .deb package. Install it.
sudo dpkg -i zenmapconvertedfile.deb

7) Thats it. Now you can run your Zenmap on your Debian.


E: Package aptitude has no installation candidate

sudo add-apt-repository "deb http://archive.ubuntu.com/ubuntu/ trusty main restricted universe multiverse"
sudo add-apt-repository deb http://archive.ubuntu.com/ubuntu/ trusty-security main restricted universe multiverse 
sudo add-apt-repository "deb http://archive.ubuntu.com/ubuntu/ trusty-updates main restricted universe multiverse" 
sudo add-apt-repository  "deb http://archive.ubuntu.com/ubuntu/ trusty-proposed main restricted universe multiverse" 
sudo add-apt-repository  "deb http://archive.ubuntu.com/ubuntu/ trusty-backports main restricted universe multiverse" 

# Then install

sudo apt-get install aptitude

Installing Minikube on Linux

To put in a simplest way, Minikube is a compact version of Kubernetes. Minikube -> Mini Kubernetes
Instead of having Master – Slave nodes set up in Kubernetes, Minikube will have all components installed in one single node cluster.
Due to limitation of your infrastructure and resources or if you just want to trial out your Kubernetes clusters, Minikube is the way to go.

Minikube will have Kubernetes Features such as –
– Config Maps, Secrets
– Container Runtime : Docker
– CNI for pod networking
– Ingress
– Dashboard

Below is a set up guide for Minikube on MX Linux.

$ uname -a
Linux mx 5.10.0-5mx-amd64 #1 SMP Debian 5.10.26-1~mx19+1 (2021-04-01) x86_64 GNU/Linux

1. Update Linux
Sudo apt update

2. Install KVM ( any kind of Hypervisor, or you can also install on docker)
Link on how to install KVM
https://tutorialforlinux.com/2020/05/19/step-by-step-kvm-mx-linux-19-installation-guide/4/

3. Download and install Minikube (Minikube has Kubectl dependency, so you will need to install kubectl first)
Minikube reference : https://minikube.sigs.k8s.io/docs/

4. Install Kubectl command line
https://kubernetes.io/docs/tasks/tools/

After all components are installed, you can now start Minikube ..
Simply use the command : minikube start
or just type in the command line minikube and it will give you the list of available commands.

To run minikube in hypervisor –
minikube start –vm-driver=kvm
In my case, KVM or any hypervisor you are going to use.

List of available drivers –
https://minikube.sigs.k8s.io/docs/drivers/

Useful commands –
kubectl cluster-info
kubectl config view
kubectl get nodes
kubectl get pod -o wide to get more information of the pods
kubectl version
minikube status
minikube dashboard –url to access Kubernetes dashboard

You will need minikube commands only at the beginning. The rest is the same as using normal kubernetes, you just need to use kubectl command.

Regards

Teza

USB drive shrink in size how to fix

Recently I have had some USB sticks which volumes shrank.
These are some of the snapshots of how my USB drive looks like.
It is actually supposed to be 16 GB drive, however showing wrong size.
If you have similar issue, read on.

Below is how it shows on My PC.


Below is how it shows on disk management.


Below is a fix to USB drives showing wrong size.

1) Open Command Prompt as an administrator. Once DISKPART is opened, type in below commands colored in RED.
2) diskpart
3) list disk you will see a list of disks currently attached. Its very important you have to make sure you select the right disk.
4) in my case I had to type : select Disk 2
5) clean
6) create partition primary
7) list partition
8) format fs=NTFS (let it complete formatting, it normally takes a few minutes)
Once done, it will show correct disk size of your USB.

❌ Exiting due to MK_ENABLE: run callbacks: running callbacks: [waiting for app.kubernetes.io/name=ingress-nginx pods: timed out waiting for the condition]

Apparently there seems to be an issue with creating Ingress controller in Minikube version 1.21

when you try to run – minikube addons enable ingress, it will be stuck at Verifying ingress addon and will come up with time out error. So far, doesnt seem like there is a fix for it. Edit: apparently if you stop / start and re run minikube addons enable ingress, it seems to be fixed.

$ minikube addons enable ingress
🔎 Verifying ingress addon…

❌ Exiting due to MK_ENABLE: run callbacks: running callbacks: [waiting for app.kubernetes.io/name=ingress-nginx pods: timed out waiting for the condition]

╭─────────────────────────────────────────────────────────────────────────────╮
│ │
│ 😿 If the above advice does not help, please let us know: │
│ 👉 https://github.com/kubernetes/minikube/issues/new/choose │
│ │
│ Please attach the following file to the GitHub issue: │
│ – /tmp/minikube_addons_b9d409a27fb1ea07e9f9f77a8866bd7b473d6d28_0.log